Fire up Nextcloud 25.x on that shiny new Raspberry Pi and put it to some good use!
What you need
In order to successfully install Nextcloud 25.x, you need the following:
- A Raspberry Pi running Raspbian Bullseye 64 bit recommended but 32 bit will work and a static IP address (or Fully Qualified Domain Name – FQDN).
- A user account with sudo privileges.
I’ll demonstrate on a server with a static IP address. If you plan on accessing your Nextcloud server from outside your LAN, you’ll not only want to configure it with your FQDN but also with HTTPS.
With those things in hand, let’s work.
Update/upgrade
Before we install Nextcloud, make sure that your server is updated and upgraded. Do note, should your kernel will be upgraded, you’ll need to reboot the server. Because of this, make sure to run the update/upgrade at a time when a reboot is possible (unless you have live patching installed, at which point you can run the task any time). To update and upgrade, log into the server to host Nextcloud and issue the following commands:
sudo apt-get update
sudo apt-get upgrade -y
Once that process completes, reboot the server (if necessary). You’re now ready to install.
LAMP
The first thing we must do is install the LAMP (Linux Apache MariaDB PHP) server stack. This can be done with the following command:
sudo apt-get install apache2 mariadb-server apt-transport-https -y
Install the PHP packages (and other dependencies) with the command:
sudo apt install php7.4 php7.4-gd php7.4-curl php7.4-zip php7.4-xml php7.4-mbstring php7.4-mysql php7.4-bz2 php7.4-intl php-smbclient php7.4-imap php7.4-gmp libapache2-mod-php7.4
PHP must be configured. This is done in the php.ini file. Open the file for editing with the command:
sudo nano /etc/php/8.0/apache2/php.ini
Make sure to locate and edit the following lines as such:
memory_limit = 512M
upload_max_filesize = 2G
max_execution_time = 360
post_max_size = 2G
Save and close that file.
Configure MariaDB and create the database
The MariaDB installation needs to be secured with a password. To do this, issue the command:
sudo mysql_secure_installation
You will be asked to set a new password. Once you do that, answer yes to the remaining questions.
To create the necessary database, enter the MariaDB prompt with the command:
sudo mysql -u root
Once in the prompt, issue the following commands:
CREATE DATABASE nextclouddb;
CREATE USER 'nextcloud'@'localhost' IDENTIFIED BY 'PASSWORD';
GRANT ALL PRIVILEGES ON nextclouddb.* TO 'nextcloud'@'localhost';
FLUSH PRIVILEGES;
exit
where PASSWORD is a strong/unique password.
Installing Nextcloud
And now we can install the Nextcloud server. Before we do, let’s create a new directory (and give it the proper permissions) with the following commands:
sudo chown www-data:www-data /var/www/html
sudo mkdir -p /var/nextcloud/data
sudo chown www-data:www-data /var/nextcloud/data
sudo chmod 750 /var/nextcloud/data
Download and unpack the Nextcloud installer file with the following commands:
cd  /var/www/html
sudo wget https://download.nextcloud.com/server/installer/setup-nextcloud.php
sudo chown www-data:www-data setup-nextcloud.php
Now perform a reboot.
sudo reboot
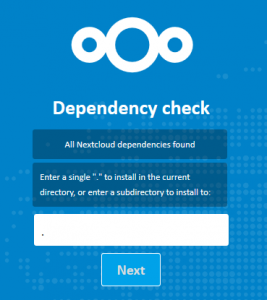
Point a browser to http://SERVER_IP/setup-nextcloud.php (where SERVER_IP is the IP address of the hosting server) and walk through the installation wizard.
Happy Cloud computing!
_-=Cinsei=-_